Monday, April 11, 2011

pennant pizzaz

Spring is here and with the warm weather we have gotten quite busy with fun events. It seems like the older my kids get, the more birthday parties they are invited to. So this year they wanted to have one of their own too. To keep things simple we had a 2-hour party, really limited the guest list, and enlisted help from family as much as possible. There were crafts, games, food, and cupcakes. Although it was fun, I'm hoping to have a 2 year break before the next party. It's already been a while and I'm still recovering!

In preparation for the celebration I discovered a cheap and easy way to make pennant banners by hand. I chose some papers from my plentiful stack of 12x12 scrapbook paper that matched my color palette. (I really need to use that up now that I'm doing digital scrapbooking.) Then I marked the paper at 3" and 9" on one side and 6" on the opposite side. I used my handy x-acto knife to make 4 cuts on each paper (shown in blue), which yielded 3 pennants per paper. The dotted lines are where I scored each pennant, folded them over simple curling ribbon and taped them securely. This made it easy to slide them around as needed.

I LOVE my x-acto knife! It does take some practice at first. Always make sure to use a cork-backed metal ruler to guide the x-acto when cutting and watch your fingers! Use a self-healing cutting mat to work on. It seems like a lot of money up front, but it's so worth it. I've used mine for 13 years now. (Which reminds me, it needs to be replaced. Time to clip my 40% off coupon and visit Joann's.) For scoring, I use a bone folder that I also LOVE and have had for years now. But for simple projects like this you can use a pointed chopstick or the back of a plastic knife.

I was happy with these cute pennant banners - one is still hanging outside on our patio surviving all the rain we've had lately. My husband was happy that we didn't spend much for decorations. The kids were happy to see their friends at the party. A win-win for all of us!

And many thanks to Auntie Lucy for her awesome cupcakes!

Sunday, March 6, 2011

seeing stripes (and solids)

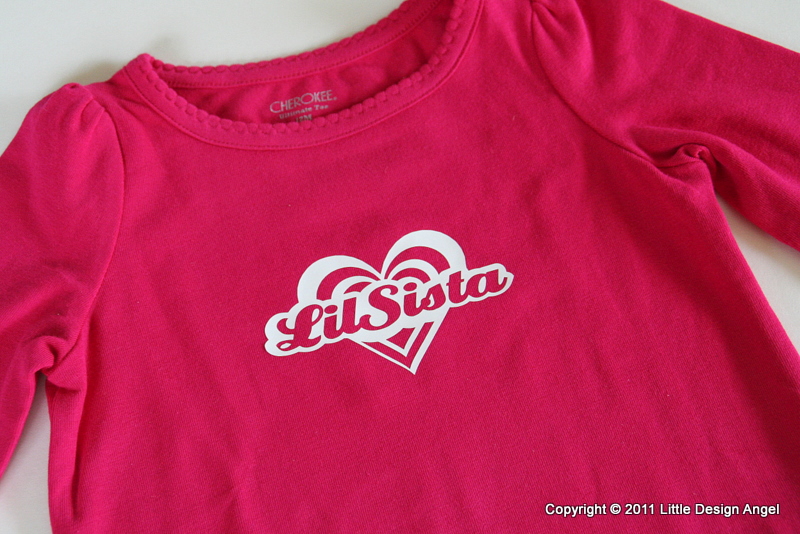
I've decided to really, finally (hopefully soon) open an Etsy shop. I've been making these little shirts as gifts for my friends' kids for about a year and now I've got a library of designs I can use. My husband thinks I should do it too, so here we go. First I have to build up an inventory, then photograph, figure out my prices, shop policies and all that good stuff. So it will still take some time. At least I'm committed to actually doing it, which means I've been buying supplies for new shirts. It's hard to find time to work with my 3 precious princesses, since I'm their only "lady-in-waiting". But a slow start is still a start.

Pictured below are some of the gifts I've made recently. I design these in Adobe Illustrator, cut them out of heat transfer paper using my Silhouette machine, and then iron them on t-shirts. So far, they hold up after washing several times. The design challenge is creating 1-color designs that have enough line weight for cutting. Adding a scripture reference, if applicable, is very important to me too. The little scripture type can be tricky to cut and peel off of the backing paper, but it's worth it.


I also designed a little tag with washing instructions on the back. Presentation can really make or break a product! I'm grateful that my years of working as a product designer helped me figure out some of this stuff already. Most importantly, I really want my Etsy store to glorify God and shine as a light for Him. To God be all glory!

Tuesday, February 8, 2011

monkey love

This year my 4-year old wanted to make some "monkey" valentines for her preschool class. She seems to be as active as a little monkey, so it seemed appropriate. :) We picked out some foam shapes at the store and some cute valentine pencils. Add it all to a simple card with a Bible verse and we're done! I set-up my file so there were 8 cards on an 8.5" x 11" sheet of cardstock (2.75" x 4.25" each), then printed the verse and trimmed it out. We punched the top and bottom with an old heart punch. It really helps to print a little circle where the punch will be so you know where to place it. I punched the corners with a corner rounder so little hands won't get scratched. My little girl had to do a lot of work sticking on foam stickers and writing her name 17 times. That's quite a lot for a 4-year old. We made these over 3 days so it wouldn't be overwhelming.

By the way, the foam shapes make great pencil toppers too. Just stick 2 large hearts together around the pencil top and squish like crazy until it's stuck. Then decorate with more foam stickers - the more the merrier. My 6-year old has been doing her homework with her special Valentine pencil, which makes it more fun.

"...if God so loved us, we also ought to love one another." 1 John 4:11

How ought we to love each other? The way God does. God's love is sacrificial, always giving, never-ending, not based on feelings, but based on His enduring commitment to us even when we don't love Him back. "But God demonstrates His own love toward us, in that while we were still sinners, Christ died for us." (Romans 5:8) What a great love we are called to show to each other, even our enemies! I know I can't love even my own husband like that without God's help. The good news is that He is ready and willing to help us. All we need to do is ask Him and believe that He will.

Have a Happy Valentine's Day!